WebHook
webhook概述
When one of those events is triggered, we’ll send a HTTP POST payload to the webhook’s configured URL. Webhooks can be used to update an external issue tracker, trigger CI builds, update a backup mirror, or even deploy to your production server. You’re only limited by your imagination.
Webhooks can be installed on an organization, a specific repository, or a GitHub App. Once installed, the webhook will be sent each time one or more subscribed events occurs.
You can create up to 20 webhooks for each event on each installation target (specific organization or specific repository).
Learn more in our Webhooks Guide.
当触发其中一个事件时,我们将向webhook配置的URL发送httppost负载。webhook可以用于更新外部问题跟踪程序、触发CI构建、更新备份镜像,甚至可以部署到生产服务器。webhook不能做的的,可能是受到想象力的限制。
webhook可以安装在组织、特定存储库或GitHub应用程序上。一旦安装,webhook将在每次发生一个或多个订阅事件时发送。
您可以为每个安装目标(特定组织或特定存储库)上的每个事件创建最多20个webhook。
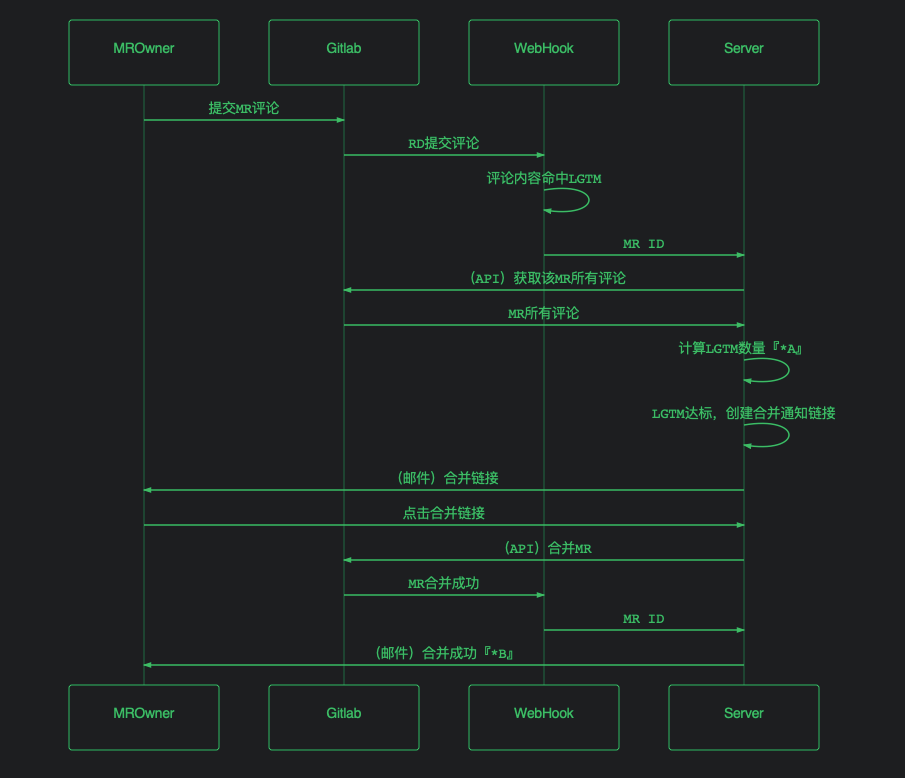
所以,Webhook顾名思义,其实就是一钩子。当我们在Github上做出某些特定操作时,可以触发钩子,去进行一些我们事先设定好的脚本,以达到某些特定功能(例如–前端项目自动发布)。
github上webhook设置
在配置webhook的时候,你可以选择自己想要接收的事件。你甚至可以选择参加触发所有事件。只有订阅特殊的需要的事件,可以有效限制服务器HTTP请求数。可以通过API或者UR随时订阅事件。默认情况下,webhook只订阅push事件。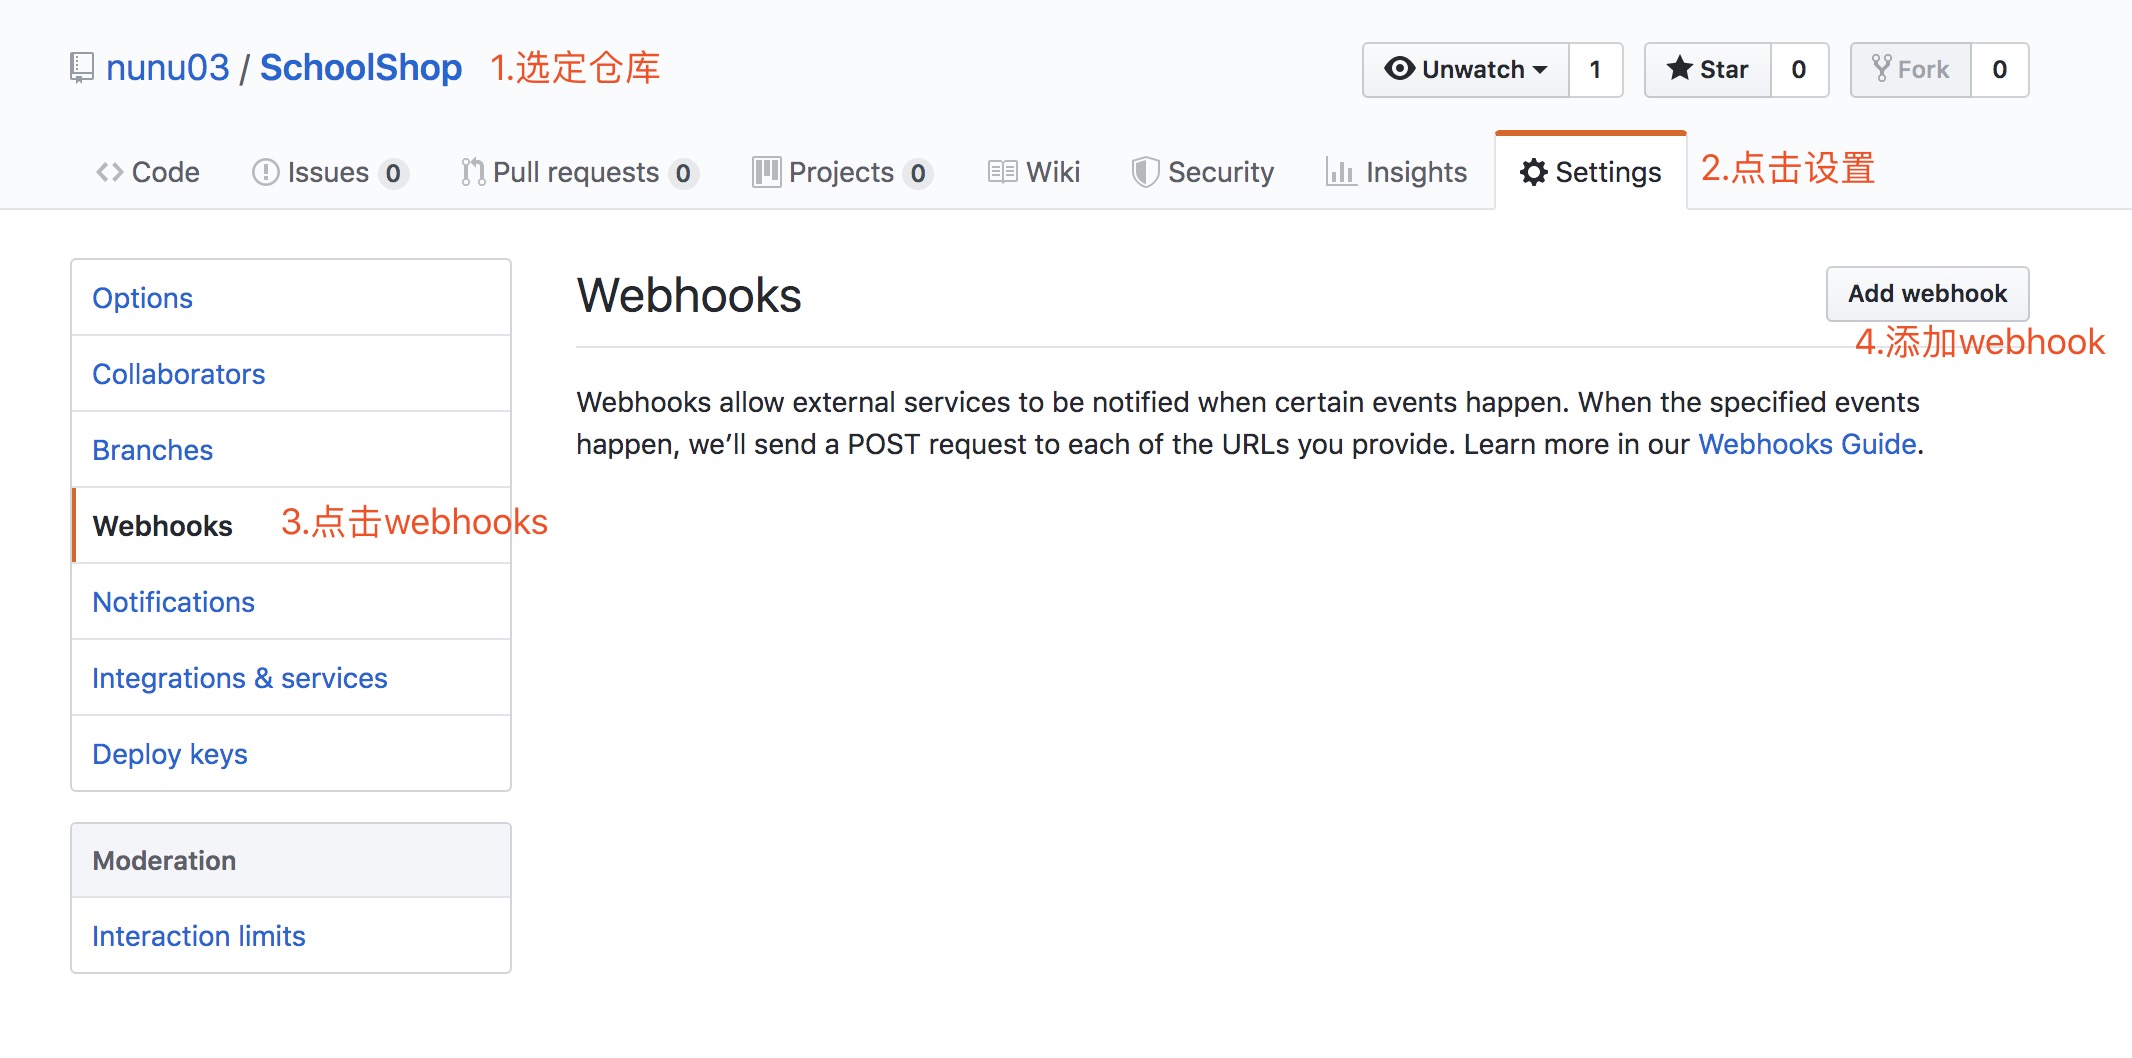
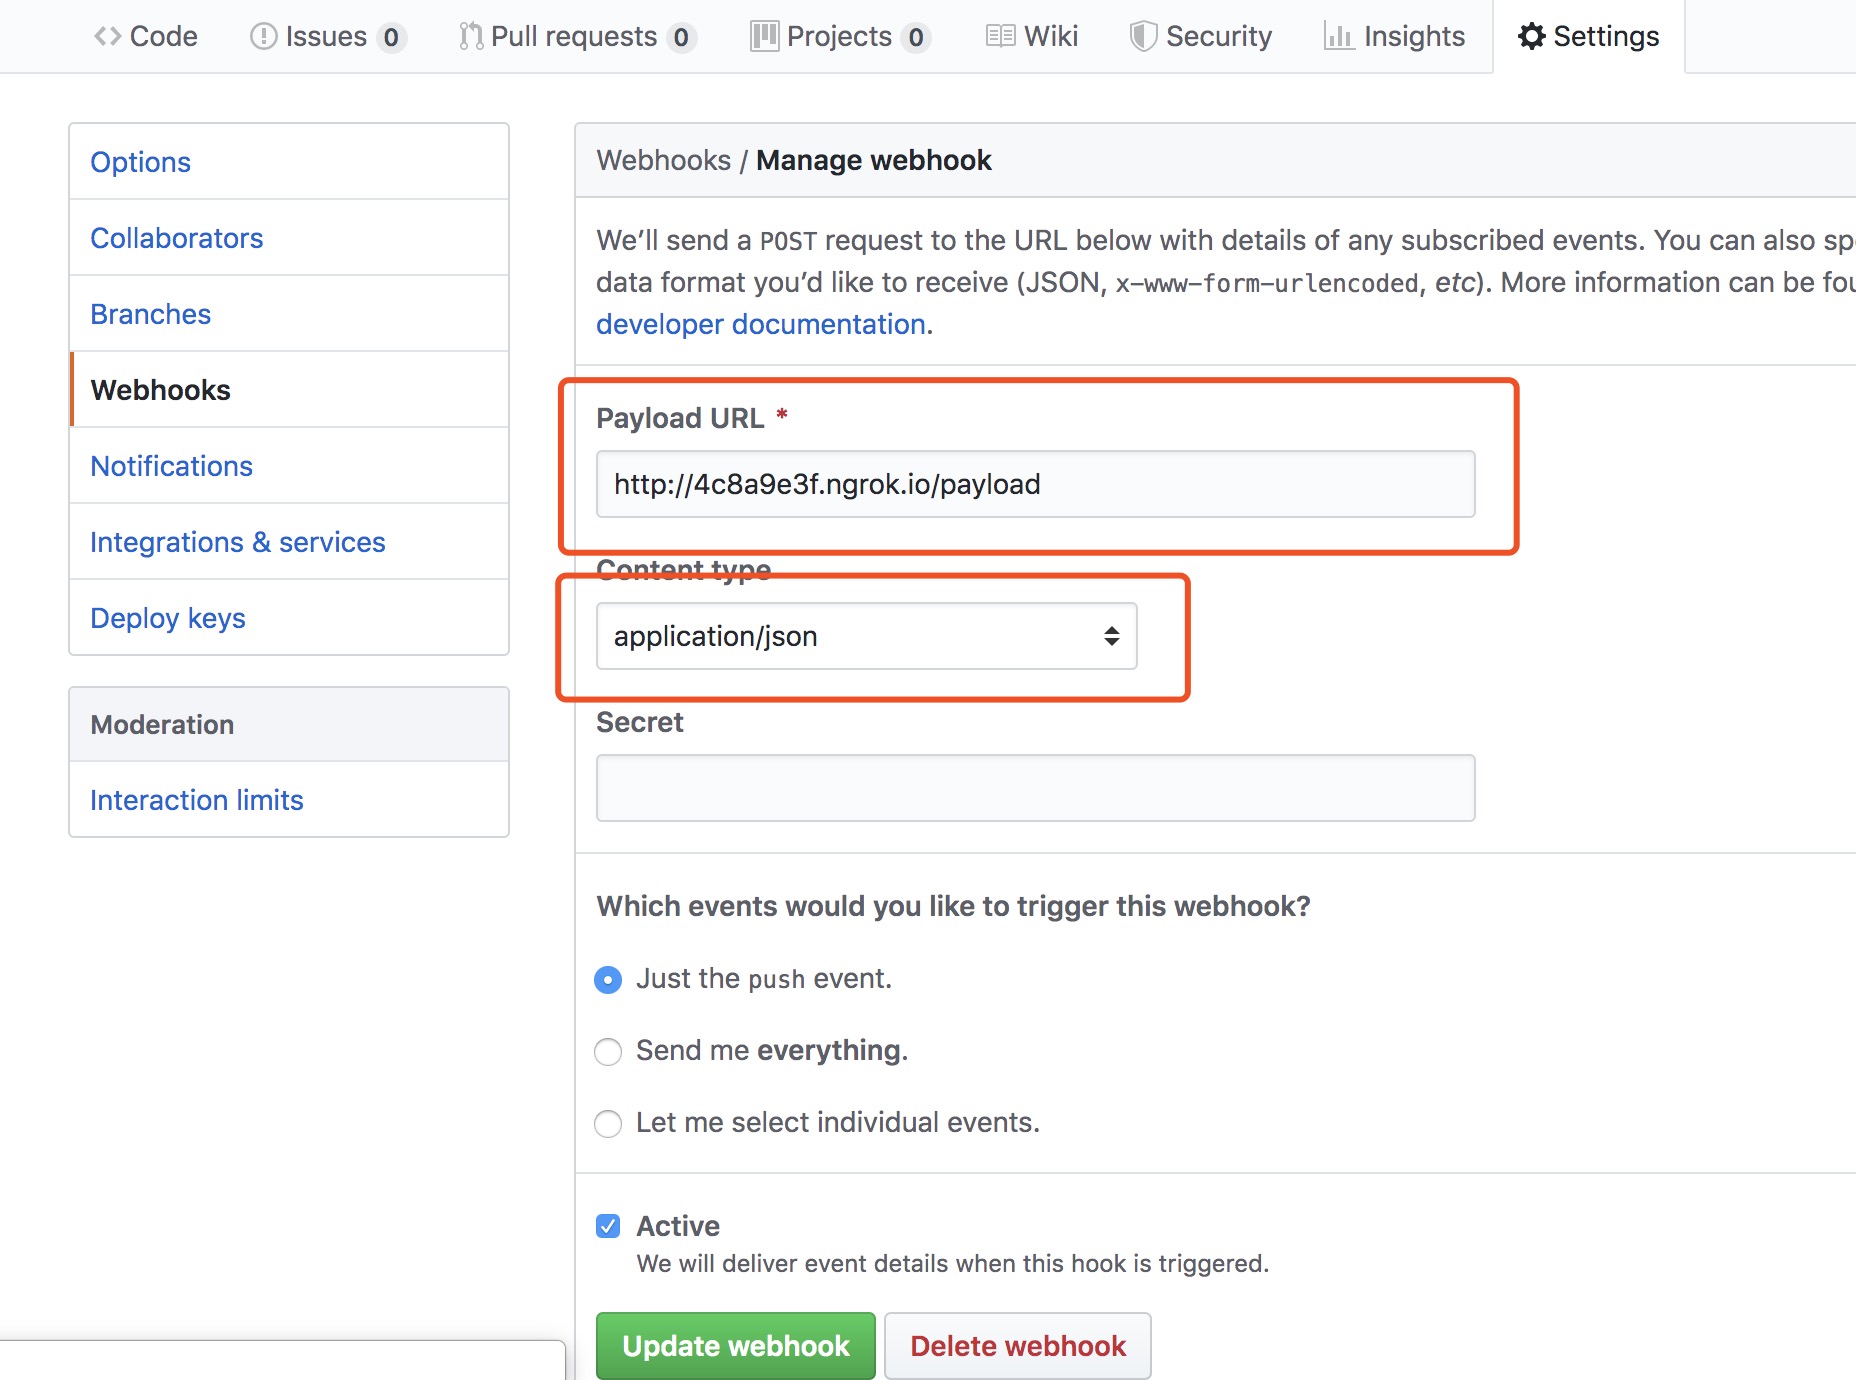
上图是我设置的好的webhook:可以看到我设置好了Payload URL和Content type.
Payload URL:就是我们要设置的钩子。
Content type:是在通知我们时传递的内容类型,一般情况下我们选择json数据格式。还有另外一种类型:application/x-www-form-urlencoded。
Which events would you like to trigger this webhook?:这个选择比较重要,直接决定了当仓库发生什么变化时才对我们进行通知。
到此webhook添加完成。
负载数据属性
每个webhook事件负载还包含事件特有的属性。
| Key | Type | Description |
|---|---|---|
| action | string | Most webhook payloads contain an action property that contains the specific activity that triggered the event. |
| sender | object | The user that triggered the event. This property is included in every webhook payload. |
| repository | object | The repository where the event occurred. Webhook payloads contain the repository property when the event occurs from activity in a repository. |
| organization | object | Webhook payloads contain the organization object when the webhook is configured for an organization or the event occurs from activity in a repository owned by an organization. |
| installation | object | The GitHub App installation. Webhook payloads contain the installation property when the event is configured for and sent to a GitHub App. For more information, see “Building GitHub App.” |
注意:
Payloads are capped at 25 MB. If your event generates a larger payload, a
webhook will not be fired. This may happen, for example, on a create event if many branches or tags are pushed at once.
报文头
发送到webhook配置URL的HTTP POST负载会包含几个指定的报文头。
X-GitHub-Event:触发分发的事件类型。
X-GitHub-Delivery:唯一识别分发的GUID。
X-Hub-Signature:HMAC十六进制的响应体。
X-Hub-Signature-256:
如果secret配置了,这个头信息将被发送。HMAC十六进制由sha1哈希算法生成,secret作为HMAC的key。
事例
通过python配置一个简单的服务器,用于接收通知信息。具体事例如下:
1 | @route('/payload', method=['GET','POST']) |
这个时候我们手动push一个信息,打印信息如下:
1 | { |
1 | payload----request.headers.X-GitHub-Event:push |
事件的驱动信息可以在webhook中查看: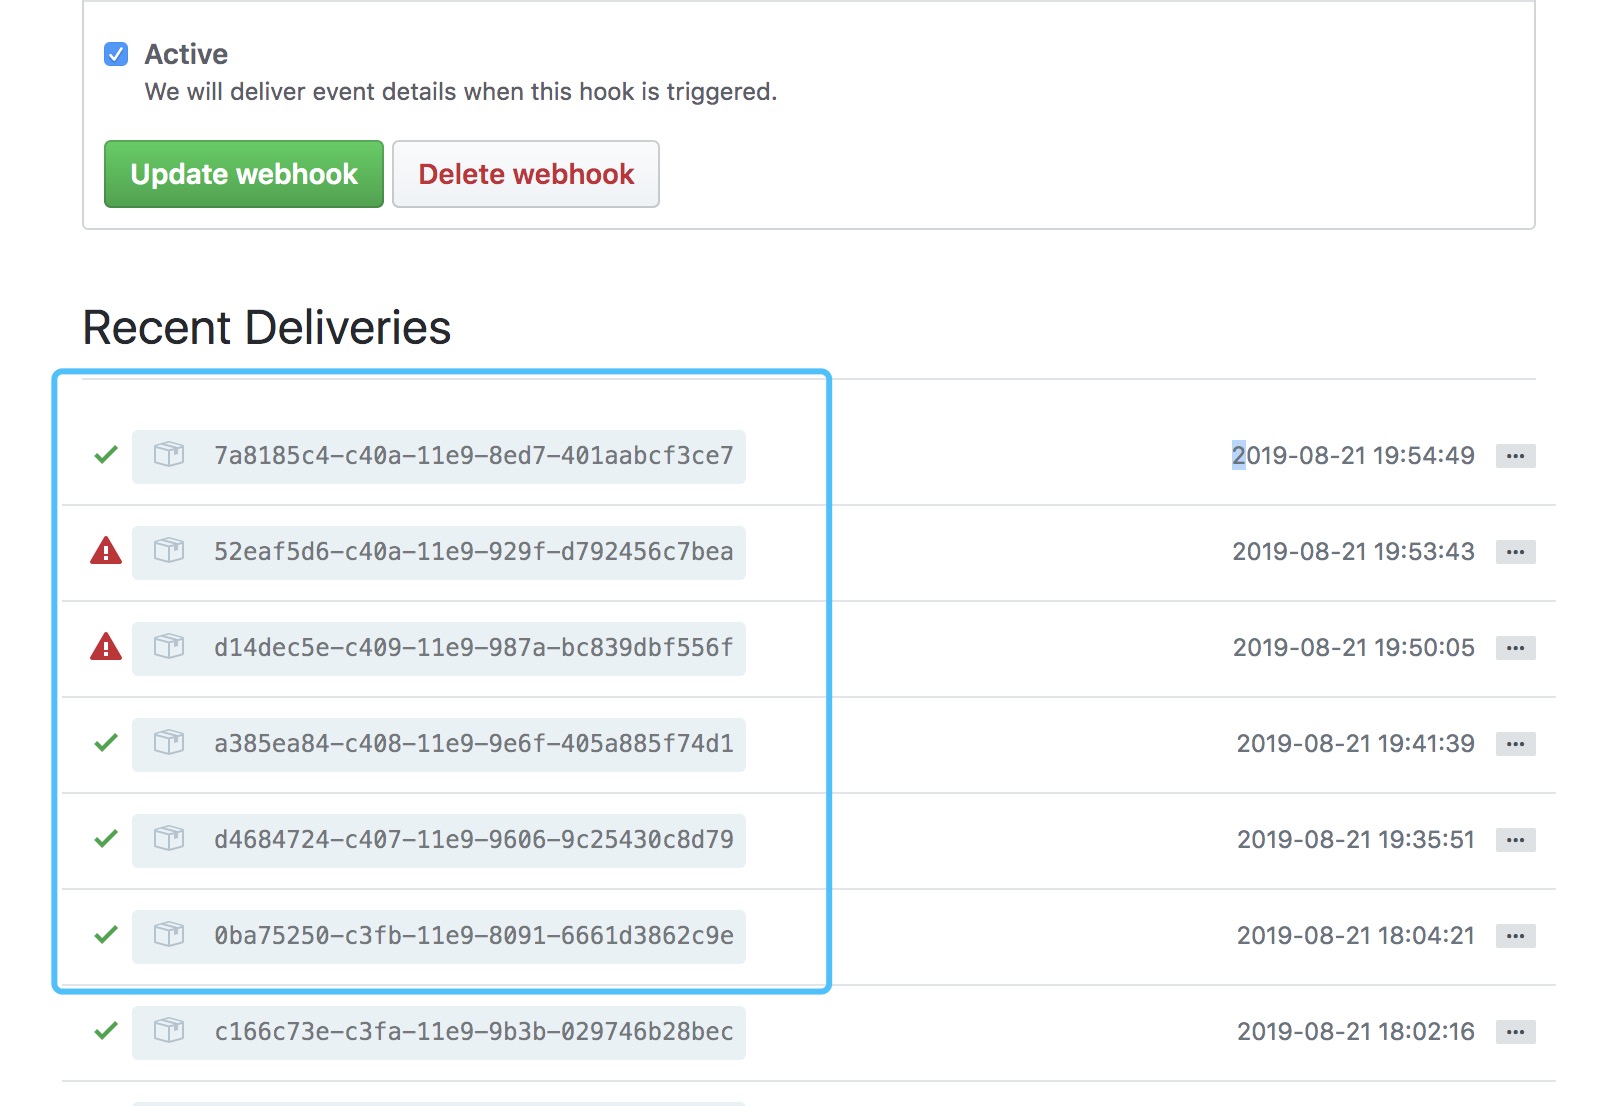
ngrok配置
你设置好了钩子,那就需要当收到通知的时候进行接收处理。这个时候要注意,我们的钩子里要求你的服务器能连接到外网上。那怎么办,我们本地做服务器,肯定就收不到通知了。这个时候推荐一个神器ngrok,它就可以让你在本地就有一个外网地址。ngrok下载地址.下载之后,在ngrok目录执行cmd:./ngrok http 4567,弹出下面的界面: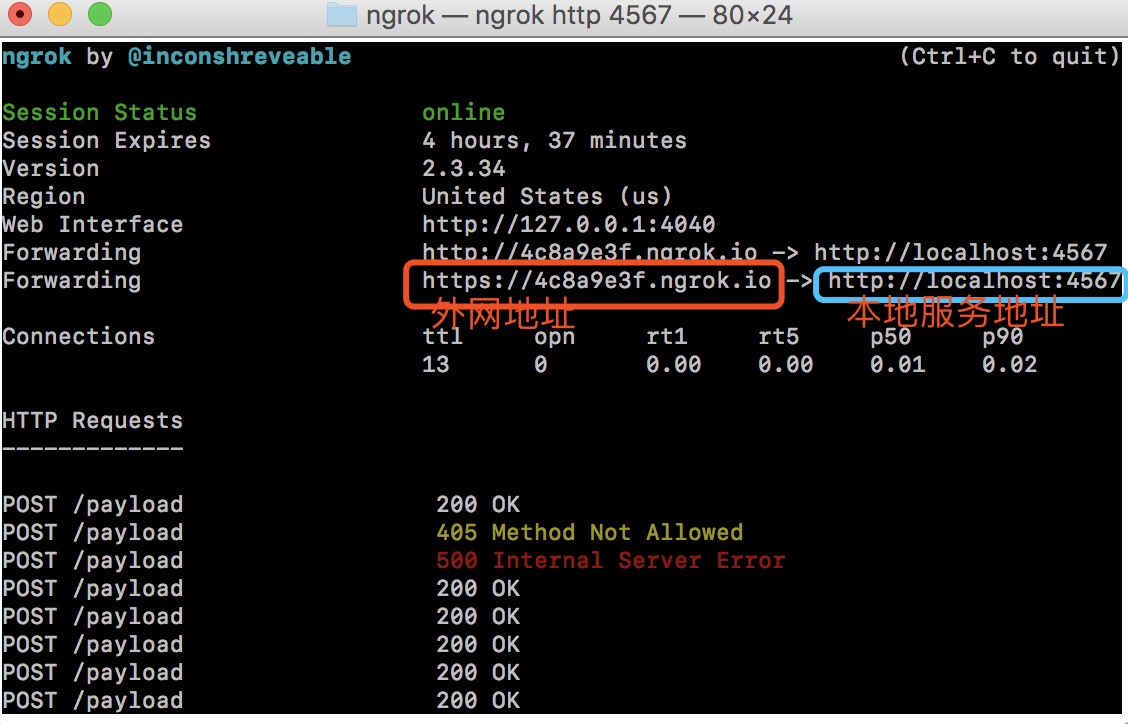
可以看到我们本地服务器的地址被映射到了一个外网的地址。而这个http://4c8a9e3f.ngrok.io/就是上图中我们设置好的Payload URL。
需要注意的是,当我们调试程序的时候,ngrok要打开,并且每次启动ngrok,外网地址都不同,每次启动有效时间为8小时。
ngrok注册
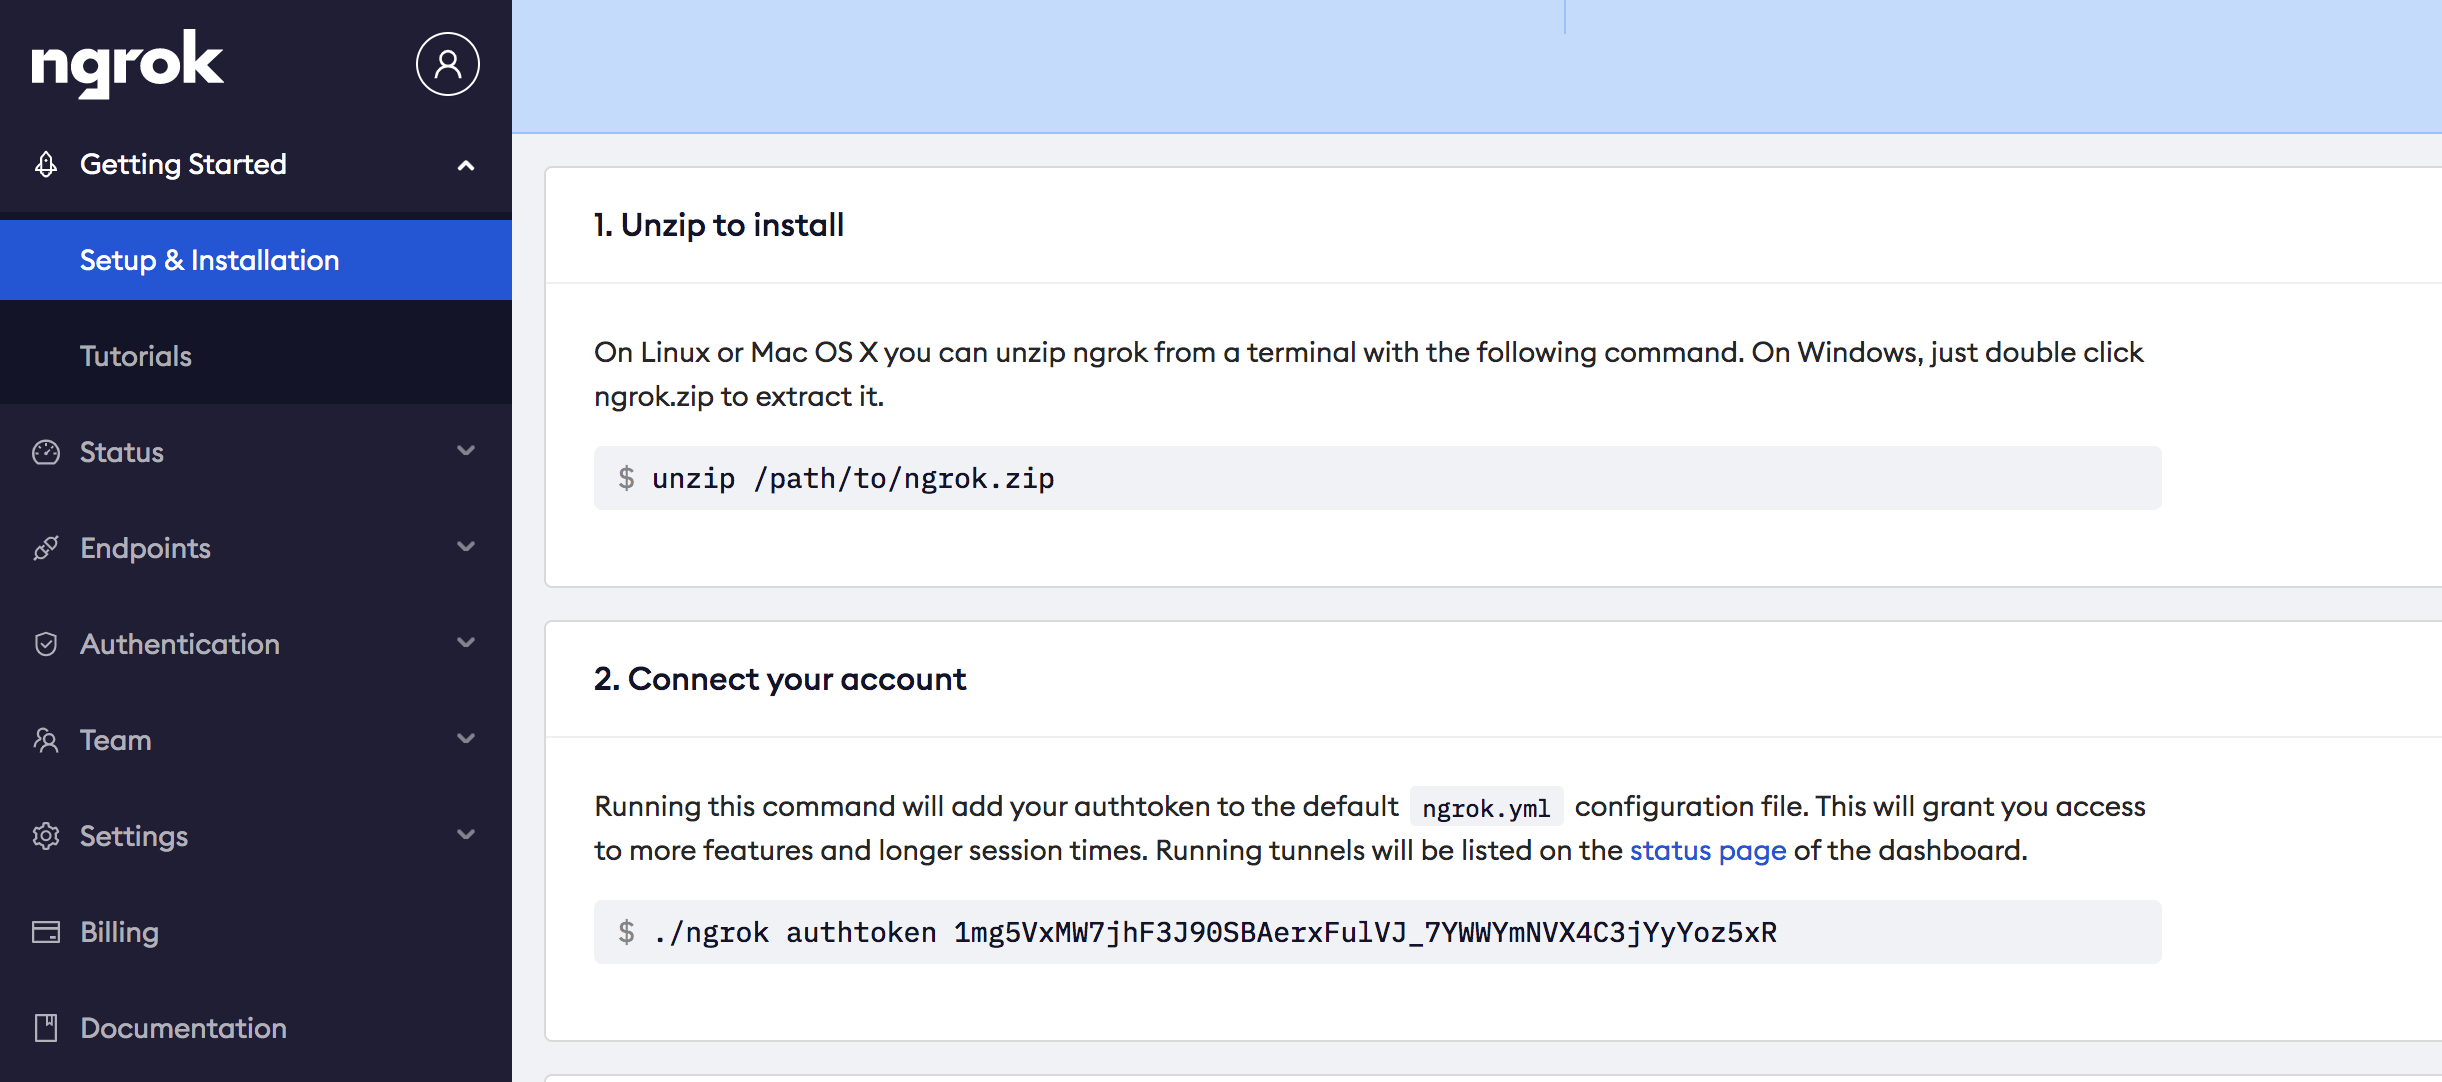
通过官网注册,拿到了authtoken,然后保存即可。
1 | chenyulong01deMacBook-Pro:ngrok chenyulong01$ ./ngrok authtoken 1mg5VxMW7jhF3J90SBAerxFulVJ_7YWWYmNVX4C3jYyYoz5xR |
使用open .ngrok2 打开ngrok.yml文件夹,ngrok.yml中存储了Authtoken,同时我们也可以修改其内容,增加root_cas: trusted,可以解决How to fix ngrok reconnecting (x509 certificate signed by unknown authority)异常问题。
其他反代理工具
localtunnel,natapp,花生壳
配置服务器
bottle
Bottle是一个简单高效的遵循WSGI的微型python Web框架。bottle几乎没有任何依赖,而且只有一个文件。而相对于python默认的SimpleHTTPServer,功能更加丰富,实用更加灵活。如果只是开发一个小型的web程序,bottle已经足够了。但是这个服务器是阻塞式的,当一个用户请求的时候,其他用户的请求会被阻塞。可以很简单的使用其他的框架来配合bottle来实现无阻塞的web服务器。
1 | @route('/') |
1 | server_names = { |
paste
| 名称 | 主页 | 介绍 |
|---|---|---|
| cgi | 以CGI脚本运行 | |
| flup | http://trac.saddi.com/flup | 以FastCGI进程运行 |
| gae | http://code.google.com/appengine/docs/python/overview.html | Google App Engine部属 |
| wsgiref | http://docs.python.org/library/wsgiref.html | 默认为单线程的服务器 |
| cherrypy | http://www.cherrypy.org/ | 多线程服务器 |
| paste | http://pythonpaste.org/ | 多线程服务器 |
| rocket | http://pypi.python.org/pypi/rocket | 多线程服务器 |
| gunicorn | http://pypi.python.org/pypi/gunicorn | 部分用C编写 |
| fapws3 | http://www.fapws.org/ | Asynchronous,基于C开发 |
| tornado | http://www.tornadoweb.org/ | Asynchronous,服务了部分 FaceBook 的服务 |
| twisted | http://twistedmatrix.com/ | Asynchronous |
| gevent | http://dieselweb.org/ | Asynchronous,基于Greenlet |
| diesel | http://dieselweb.org/ | Asynchronous,基于Greenlet |
| meinheld | http://pypi.python.org/pypi/meinheld | Asynchronous,部分基于C开发 |
| bjoern | http://pypi.python.org/pypi/bjoern | Asynchronous,非常快,基于C开发 |
| auto | 自动选择一个可用的服务器 |
启动
nohup python3 -u githook.py > nohup.log 2>&1 &
nohup:放在命令的开头,表示不挂起(no hang up),也即,关闭终端或者退出某个账号,进程也继续保持运行状态。
-u :不启用缓冲。
nohup.log:日志文件
2>&1:也就表示将错误重定向到标准输出上
& :放在命令到结尾,表示后台运行,防止终端一直被某个进程占用,这样终端可以执行别到任务。
注意使用nohup命令后台运行命令之后,需要使用exit正常退出当前账户,这样才能保证命令一直在后台运行。否则当前账户非正常退出或者结束的时候,命令还是会结束。
注意点
1.我们的路由@route(‘/payload’, method=[‘GET’,’POST’])是必填的,如果丢失method,我们将不能受到请求。同时payload,要与Payload URL中设置的名一样。
2.requests
print(r):<Response [200]>
print(r.json):{‘id’: 132968, ‘iid’: 2182437, ‘project_id’: 15509,
print(r.text):{“id”:132968,”iid”:2182437,”project_id”:15509,
json.dumps(r.json())
3.can only concatenate str (not “int”) to str
print(‘payload—-projectid:%d’ % projectid)
MR方案
遇到问题
1.Could not fetch URL https://pypi.python.org/simple/requests/: There was a problem confirming the ssl certificate: [SSL: CERTIFICATE_VERIFY_FAILED] certificate verify failed (_ssl.c:777) - skipping
Could not find a version that satisfies the requirement requests (from versions: )
No matching distribution found for requests
解决方法:pip3 install requests -i http://pypi.douban.com/simple –trusted-host=pypi.douban.com
2.升级pip
解决方法:尝试使用如下指令
pip install -U pip
sudo easy_install –upgrade pip
3.405 Method Not Allowed
路由名不对与Payload URL中设置的名不一样,或者method丢失。
参考资料
x509 certificate signed by unknown authority
映射公网花生壳、PubYun、NoIP、DynDNS、Ngrok、Tunnel、localtunnel、pagekite
Ursprünglicher Link: http://nunu03.github.io/2019/08/21/通过ngrok搭建github的webhook/
Copyright-Erklärung: 转载请注明出处.